Sunday, December 1, 2013

C++ testing with t-unit

First of all: t-unit is released as open source under the MIT license, and the repository is available at: https://github.com/Lavesson/t-unit. There's also a quick start guide and a wiki available - For some background info, keep on reading.

The need for something simple

So, I wanted a simple unit test environment to test the logic in the 3D engine that I'm writing. What I really wanted was a unit test environment AND some way to output the results in an easy way.

I looked at a couple of different approaches, and most of the frameworks seems to be either, unportable, unmaintained, a hassle to build or simply just a piece of a much larger framework that you have no intention of using.

So my thoughts went to TAP (Test Anything Protocol). If I could just output a series of ok/not ok to a console, that would suffice for now. I hacked together a couple of header files which I could include in my project to make simple assertions and print ok/not ok with some debug info to standard output. I wrote this first implementation in a couple of days. It wasn't perfect, but it worked pretty well. I open-sourced the header files and called them tap-unit.

When I hit a large number of tests (or at least 100+), I realized that I wanted to condense the information in some way. I toyed with the idea of having an HTML report generator, as well as compress the test results into *just* showing the failing tests from a console. At first, I experimented with taking the TAP stream and piping it to a parser which produced either HTML or some nicely formatted output to the console. At this point I basically had my own assertion classes and macros for expanding test cases and fixtures, so TAP wasn't really central anymore, and constructing TAP just to parse it again just added another layer of indirection (without really gaining anything from it).

I rewrote the basic output generator and simply created instances of test cases as I ran them and just wrote a bunch of different report generators, such as TAP, HTML and console. This was much more modular. I changed the name from tap-unit to t-unit.

Introducing t-unit

First of all, t-unit is entirely header-based. There's no implementation files and nothing to build in advance (expect if you want to build the sample apps). You simply include t-unit.h and start writing tests. I wanted to use t-unit on some other projects as well, some of them on Linux, which means that I had to get it to compile on both MSVC and GCC. 

The tests are written and compiled as an executable file which is run manually. Tests are contained in fixtures the same way as many xUnit frameworks do (I happen to like this model of organizing tests). A typical test fixture with setup/teardown might look like:

FIXTURE(account_tests)
{
    account* sut;

    SETUP()
    {
        // Using a raw pointer. We need to clean this up after every test.
        sut = new enterprise_account(100);
    }

    TEST(starts_with_initial_sum)
    {
        assert.are_equal(100, sut->balance(), "expected correct balance at startup");
    }

    TEST(can_withdraw)
    {
        sut->withdraw(25);
        assert.are_equal(75, sut->balance(), "expected correct balance after withdrawing");
    }

    TEARDOWN()
    {
        // delete the account created in setup
        delete sut;
    }
}

Of course, the TEARDOWN macro could be avoided here by using a unique_ptr instead. I'm not going to get into the details here, but instead urge you to read the quick start guide or take a look at the examples in the wiki on Github.

Report generators

In the main method of the executable containing the file, you write some simple boilerplate code to wire everything up. For instance, to create a console report, you would write:
#include <t-unit.h>
#include <console-report.h>

int main()
{
    test_runner::run_all_tests();
    console_report cr;
    test_runner::create_report(cr);
    return 0;
}
You build and execute your project and should (hopefully) get a console report. A simple report example is shown below:


There's more report generators available (TAP and HTML). Again, for more information, consult the wiki. Most notably the generating reports section.

It would be nice to see other people use this, but even if I'm the only one doing so, I will still have gained something - A simple header-based testing utility which I can include in any project and just rebuild it as I write tests (or updates t-unit).

Oh: Bug reports and suggestions on improvements are, of course, welcome :)

Friday, March 22, 2013

C++ ownership semantics

I always get a distinct feeling that smart pointers in C++ are seen as a magical way to handle memory automatically. A lot of discussions often end up in why you should pick smart pointers over raw pointers. Even though I think that it's more of a question in WHICH cases you should do this, I also think it's a secondary point to be made. As I interpret it, the primary point to be made is rather the semantics bound to the smart pointers, and the notion of ownership associated with pointers in general. Choosing the correct type of pointer is simply an effect of this. I'll try to describe what I mean in this post.

When I started programming C++ (around 1998-1999 I think) one of the most annoying things were (and in a sense, still is) memory management. It's also one of the hardest things to get right, even today.

At the time, I usually tried to stick to some hard rules, the most important one being: don't allocate things on the heap if you don't have too. Basically, if the following suits your purpose:
// Stack-allocated auto-variable. No need for manual cleanup
MyType t;

... Then don't do this:
// Heap-allocation - Needs to be deleted at some point
MyType* t = new MyType();

However, sometimes (certainly when working with polymorphic types) we actually need to use pointers and initialize them using new. At that point, it becomes a question of whose responsibility it is to delete the actual pointer when we're done. Because yes - someone must have that responsibility if you want to avoid memory leaks.

The stack is awesome in the sense that stack-allocated variables are easily cleaned up at the end of their defining scope. The usual way to utilize this is through smart pointers. The general idea around smart pointers is easy: Encapsulate a raw pointer inside a stack-allocated type and delete the pointer in the destructor.

There's a bunch of smart pointers out there, both in the Boost C++ library and in the standard library. I'm not going to rant about auto_ptr from C++ 03 here - there's plenty of articles describing the faulty behaviour of auto_ptr out there. It's broken, and we all know it. I'm actually not going to rant at all, but rather point out (no pun intended) some ideas around the semantics of  these pointers. The reason is that I've (more than once) come across the misconception that raw pointers should never ever be used under any circumstances at all. Ever. You should only use smart pointers. I get what people are usually saying when they make that claim, but I think that a standpoint such as that one obscures the idea around ownership. I'm somewhat guilty of giving a half-assed view of this myself in a previous blogpost, where I wrote something along the lines of "Bottom line: avoid raw pointers, use smart pointers". It's not entirely wrong, but it's a lot deeper than that.


Determining ownership

It's not that raw pointers are bad, per se. It's just that they make it hard for the programmer to actually tell who the owner is. To illustrate this point, consider the class interfaces below. Since I'm in the midst of writing a 3D-renderer right now, I'll use some rendereresque class examples:


The Device-class presumably creates a VertexBuffer and returns a pointer to the instance through CreateVertexBuffer. This can then be passed to another class (such as the Mesh-class through the constructor). So, we might use these classes in something resembling the following code snippet:


The problem with raw pointers becomes painfully apparent after writing a bunch of code in this style for a while. For instance, who OWNS the VertexBuffer-pointer? Who is responsible for actually cleaning up after it? Is the lifetime of the buffer-variable bound to the lifetime of the device-variable? In other words, will it be removed in the destructor of the Device class? Or is it up to you, the consumer of this instance to actually delete the pointer? At least let's hope that it's not the Mesh-destructor that removes it. That would be REALLY bad since we could actually have passed the same pointer to several Mesh-instances, leaving every other Mesh with a dangling pointer inside.

If you were to assume that the Device class handles this internally and you never delete the VertexBuffer-pointer, as shown below then one of two things will happen

The two things that can happen are:
  1. You were correct in your assumption and the program works as expected.
  2. Your guess was wrong - The pointer was never deleted, and now you have a memory leak.
If, instead, you were to assume that the Device class does NOT handle this internally and were to delete it yourself just to be sure as shown below, one of two things could still happen:

The two things in this case are:
  1. You were correct in your assumption and the program works as expected.
  2. Your guess was wrong - The device class WILL try and delete the pointer. But since you've already done that, it'll try to delete a dangling pointer, and your program would most likely crash.
This is mostly to demonstrate the problem with a non-obvious ownership in C++. And don't get me wrong. This isn't always apparent - Managing memory correctly is HARD. If you just link against the header files and don't have access to the implementation (which you shouldn't need in this case anyway) you have no way of knowing the semantics of any of these classes in terms of how they handle memory.

This is exactly why the semantics of ownership are important - If we can establish ownership, then we at least have a lot of help when managing memory in C++.


Smart pointers

Smart pointers (as described before) help us a lot. There are different semantics tied to each one, determining how/if they are copyable or movable. Since C++ does stack unwinding when an exception is thrown (basically, calls the destructor on stack-allocated objects), it also helps us with cleanup when something goes wrong, just to mention a few perks.

The ones I'm going to focus on are the two widely used unique_ptr and shared_ptr. I tend to use unique_ptr in a lot more places than I do with shared_ptr - I'll try to explain why in a while. A short description of these pointers is in place:
  1. unique_ptr encapsulates a raw pointer and can't be copied. Trying to assign one unique_ptr to another will give a compile error. It basically replaces the deprecated auto_ptr, but which much clearer semantics. A pointer of this type CAN be moved though, meaning that it gives up ownership of its inner pointer to another unique_ptr instance. This has to be done explicitly by the developer by using std::move
  2. As opposed to unique_ptr, shared_ptr can be copied. It involves somewhat more overhead since it relies on reference counting. Everytime a shared_ptr runs out of scope, the reference counter goes down. Or, in the case of 0 references, the pointer is deleted.
I'm not going to describe the functionality in much more detail than that right now. Other articles and blog posts do that. I'm going to focus on how they help with memory management.

If I know for a fact how each of these pointers actually work, then rewriting the Device class from before to the following gives me a lot more information to work with:

I know, without a doubt, that this class gives me a unique_ptr for a VertexBuffer. I know that I'm now the sole owner of this pointer. It's unique, so there can't be a copy of it inside the Device class. Granted, the Device implementation could store the raw pointer as a private member and delete that one. But that's just an extremely sinister thing to do when returning a unique_ptr, so I'll ignore that.

Basically, the Device type is now telling us that WE are the sole owners of the buffer. It's in our control and it's up to us what will happen from this point forward. Now, it's easy to think that this unique_ptr is only useful in one scope only, since it is apparently unique and can't be copied. But I have to pass a VertexBuffer* to the Mesh implementation, and obviously I can't change the signature to take a unique_ptr and pass the unique_ptr I obtained from Device on - That would be a copy operation.

And no - I'm not going to tell you to use a shared_ptr instead, even though it would work. Since we are then doing reference counting instead, we actually can't claim to have "sole ownership" anymore. A shared_ptr more or less means shared ownership. So here is the thing: I don't really think that leaving the Mesh interface as-is is a bad thing in this case, simply because it is not the owner! Let's look at a snippet of code again, assuming that we're now returning a unique_ptr from Device. I'll also use a unique_ptr to create my Device and Mesh (I'll explain my reasons for this later on)

And yes - I am using raw pointers here. Using std::unique_ptr::get() allows you to get the underlying pointer. And the thing is, I don't really think this is a bad thing to do, granted that the class that you're passing the pointer to is soundly written. I know that when I pass a pointer to a constructor in this way, then it's more of a DI-pattern. It wouldn't make sense for the Mesh-class to delete this resource. Also, notice that the parameter is a VertexBuffer* const. The "const" is important, since it stops that class from modifying the pointer itself (it can still mutate the object being pointed at, but not "re-point" at another object).

Finally - There's still the option to use the shared_ptr and its reference counter. It also has a corresponding weak_ptr that lets you model a temporary ownership (and to break circular references of shared_ptr). As I said before, I usually prefer the unique_ptr, and the reason is simply because it's much clearer in its ownership semantics. Using a shared_ptr by default implies a shared ownership of a pointer, which muddles the boundaries of ownership. When talking to people about shared pointers, I sometimes get the distinct feeling that some programmer's uses them to mimic the way they would write code in a garbage collected language, such as C# or Java. However, just a ref-counter does not a GC make, and we shouldn't suddenly pretend that we can use a shared_ptr and do away with memory issues.

Don't get me wrong - There are times when the shared_ptr is just the thing to use. I just think those times are far apart.

Anyway - This is basically my interpretation of the whole RAII-idiom and the usage of smart pointers. I think smart pointers are a great help in memory management, but not ONLY for the simple reason that they "get cleaned up automatically". I think it all comes down to semantics and understanding how your code is partitioned, and not necessarily on "smart pointers vs. raw pointers", which a lot of debates (but not all of them) seem to focus on.

My take on this might of course be flawed, and I'm always up for discussion. So please, do comment ;)

Monday, July 9, 2012

A small C++ 11 Cameo


1. Introduction
Some time ago, I held some evening seminars about C++. I tried to mix my own experiences with inspiration  drawn from other sources, such as colleagues, the C++ 11 standard and Scott Meyer's Effective C++.

Overall, the seminars went well, and I'm currently combining the material into a one-day workshop for Edument (where I work). One of the highlights of the seminars was the "What's new in C++ 11, and what compiler support do we have?"-part.

In this article, I'll share some of the highlights, such as my own personal favorite additions to the language. When doing my research for the seminars and putting the material together, I spent a lot of time reading the C++ 11 standard. While the standard is very detailed, it's not always the best place to go for learning. At the same time, I had some trouble finding short and concise sources for syntax-lookup for some of the newer features. So, instead of writing a lengthy article about a certain feature (there's a lot of articles and tutorials out there that does that perfectly well), I'll try and present the features by showing the usage as soon as possible, followed by a small description/example.

This is by no means an exhaustive list of the C++ 11 standard. This is merely some of the points of my talks. I will cover the following points:

  • New keyword - nullptr
  • Type inference - Redefinition of auto
  • Lambdas
  • Varied smart pointers and the deprecation of auto_ptr


2. Features
So, without further ado, I'll list some of the new features of the C++ 11 standard in this section. I'll try to start each feature with a small code listing, showing how to use it, followed by a little more detail.


2.1 - New keyword - nullptr
In order to create a null pointer, we can now do the following:

char* varName = nullptr;

Before this, we simply used NULL or even 0. Basically, NULL is a remnant macro from C that made its way into C++ as well. The C++ definition varies slightly. For instance, by checking the header file stddef.h in GCC, you'll find (amongst other things) the following:

#ifndef
__cplusplus
#define NULL ((void *)0)
#else   /* C++ */
#define NULL 0

So, in C, we define NULL as ((void *)0), and in C++, we simply define it as 0. This means that the NULL macro could be interpreted as an integer as well. This could have some odd side effects from time to time. Consider the following simple example, where we're writing a template class:

template <typename T>  
class MyType {
private:
    // ...  

public:
    void MyMethod(T input) {  
        if (input == NULL) {  
            cout << "NULL pointer!" << endl;  
        }  
        else {  
            cout << "Not a NULL pointer" << endl;  
        }  
    }  
};  
This class is making a small (and perhaps not entirely sane) assumption, namely that we're working with a pointer. In reality, nothing stops us from creating a MyType<int> as well. Since the NULL macro expands as 0 or 0L, the check input == NULL would still work, even though we're using an int (or anything else that is comparable with an integer). This could either compile past this point, and (in best case) throw a compiler error at a later point, or (worse) give us hard-to-track-down runtime errors. In this case, nullptr is usable. Substituting NULL with nullptr will instead give us a compiler error since this check will fail when instantiating the template:

Figure 1: nullptr to the rescue

This is obviously just a small example, but the idea is to show that we get a mismatch between the NULL macro and the idea of a null pointer.


2.2 - Type inference - Redefinition of auto
Yes, C++ now has type inference, meaning we don't have to explicitily instruct the compiler about the type when declaring variables. Its basic usage is:

auto varName = someInstance.GiveMeSomething();

The
auto keyword has been redefined. In previous versions, its usage has been to declare an automatic variable, meaning a variable whose lifetime is bound to its scope. Sounds familiar? It probably should, since this is the default behaviour for every variable created on the stack in C++. When was the last time you actually (explicitily) declared an variable as automatic?

One situation (out of many), where I find this useful, is when declaring stuff like iterators. It's quite nice to use with lambdas as well (as we shall see later). For instance. Suppose we want to iterate over an STL-list and want to declare an iterator:


list<string>::iterator beginIter = names.begin();

... Well, now we could do the following instead:

auto beginIter = names.begin();

But type inference is not only syntactic sugar. As shown in the C++ 0x FAQ by Bjarne Stroustrup, this is even more valuable when the exact type is more or less impossible (or at least hard) for the programmer to deduct. Consider the following example (borrowed from the aforementioned FAQ):

template<typename T, typename U> 
void multiply(const vector<T>& vt, const vector<U>& vu)
{
    // ...
    auto tmp = vt[i]*vu[i];
    // ...
}

The elements in the input vectors are of type T and type U. We're multiplying two elements and assigning the result to a temporary variable (tmp). The type of this variable is dependent on the typenames. In this case, auto is an invaluable tool to deduce the type of tmp depending on the actual template parameters.

I received some mixed comments whether type inference is too obscuring or not. Personally, I love it. It reminds me a lot of the type inference in C# (using the var keyword). It forces you to think your variable naming through and actually give them semantically meaningful names.


2.3 - Lambdas
Basic syntax:

[](){};                   // Implicit return type

[]() -> return_type {};   // Explicit return type

Lambdas in C++ serve a very useful purpose. Basically, we're talking about anonymous functions with the ability to capture variables in the scope where the lambda is defined. This means that we can use C++ lambdas as closures (or not, if we prefer that). This is a concept not so much from the object oriented paradigm, but from functional programming.


The ABSOLUTELY simplest case (which will actually compile) is:

[](){};


The square brackets is called the capture clause. Here, you'll define which variables from the outlying scope you want to capture (meaning: have access to inside the lambda). For instance, to capture everything by reference or by value, we would do the following:


[&](){}; 
// Capture everything by reference
[=](){};  // Capture everything by value


The parentheses are the function argument list and the curly brackets are the method body. The return type is either infered from usage or explicit from the declaration. A few quick examples:


Lambda example 1:
// An alternative to function pointers,
// Combined with the auto keyword:
auto add = [](int a, int b){ return a+b; };
int sum = add(4,5);

Lambda 
example 2:
// Same as before, explicit return type:
auto add = [](int a, int b) -> int{ return a+b; };
int sum = add(4,5);

Lambda example 3:

// Capturing all local variables as references
auto myLambda = [&]() -> int{ // Body };

// ... And as values:
auto  myLambda  = [=]() -> int{ // Body };


Lambda example 4:
// Capturing one external variable by reference, 
// and one by value:
int x = 5;int y = 10;

// Defining the lambda

auto lambda = [&x, y]() {
    x++; // OK
    y++; // Not OK
};


2.3.1 - When to use lambdas
I tend to use lambdas instead of C++ Functors (and function/function pointers). For instance, when iterating with a for_each loop. I normally did the following in C++ 98:

list<int> values;
MyFunctor func;

// ... Populate "values"

// Iterate collection
for_each(values.begin(), values.end(), func);

... Where MyFunctor was a function object on the following form:

class MyFunctor {
public:
    void operator()(int obj) {
        // Do stuff here on each iteration
    }
};

Since lambdas, this iteration has now been reduced to:

for_each(values.begin(), values.end(), [&](){
    // Do stuff here on each iteration
});

There ARE still scenarios when we might want to use something else than a lambda, of course. But nevertheless, it's a nice and powerful feature which I'll gladly use.


2.4 - Varied smart pointers and the deprecation of auto_ptr
Smart pointers has been around for some time. Basically, we're wrapping raw pointers in a class that can be created as an automatic variable instead, leaving cleanup to the destructor call when we're running out of scope. 

We've hade the auto_ptr for some time (
with all its flaws). For instance, the semantics of auto_ptr means a strict ownership; If you try to copy one auto_ptr to another, the first auto_ptr give its ownership up to the second one. If the second auto_ptr already owns a resource, this will get freed up first. This meant that some algorithms (such as some sort algorithms in the standard library) that relied upon making local copies of elements stopped working correctly.

Anyway: auto_ptr is being deprecated in favour of unique_ptr. We also have access to yet another smart pointer type called shared_ptr. They both have their background in the Boost library. Their basic usage is:

unique_ptr<SomeType> uPtr(new SomeType(5));
shared_ptr<SomeType> sPtr = make_shared<SomeType>(5);
The basic idea of these pointers is the same as before: We're wrapping a raw pointer in another class. Since we're creating uPtr and sPtr as ordinary variables, we're creating them on the stack, not the heap, meaning their destructors will get called automatically when they're running out of scope. The wrapped raw pointer is created on the heap, but will get deleted as soon as the unique_ptr instance is destroyed. A really nice feature with this design is that we're taking advantage of the C++ stack unwinding, meaning we're cleaning up our resources even if an exception is thrown (this is not the case with raw pointers).

Other than that, the major difference between shared_ptr and unique_ptr is that shared_ptr allows several shared pointers to contain the same pointer. It keeps track of the number of instances with an internal counter which decreases everytime a shared pointer goes out of scope. The actual resource is not cleaned up until the last shared_ptr has exited its scope (setting the counter to 0). 


A unique_ptr instance on the other hand, has the same idea of strict ownership as the auto_ptr, but with one major difference. While you COULD "copy" an auto_ptr (or rather: give the resource up), the assignment operator of the unique_ptr is non-public, meaning you'll get a compiler error if you try to assign it. This is definitely an improvement over auto_ptr.


Bottom line: Avoid raw pointers. Use smart pointers.


3. Conclusion
As I said in the beginning of this article, this is not an exhaustive list of C++ 11 features. Far from it. I've not even touched some of the larger areas, such as threads or variadic templates. The things that I've talked about in this post is relatively small changes, but still something that could have a huge impact on your code. I for one, don't write for_each-loops without using lambda expressions anymore. It would have been fun to write about more features and add more examples and descriptions, but this is starting to be quite a long blog post. I might write another C++ article in the future though :)


4. Useful links from the article
The following links has been present in the article. They provide content for reading more in-depth about everything that I've written about in this article.

  1. Scott Meyer's Effective C++
  2. Edument - Development and mentorship
  3. cplusplus.com on the NULL macro
  4. Wikipedia on Type Inference
  5. Wikipedia on automatic variables
  6. The C++ 11 FAQ by Bjarne Stroustrup
  7. The flaws of the auto_ptr class
  8. Boost C++ libraries
  9. MSDN on Stack Unwinding in C++

Wednesday, February 22, 2012

ReSharper versus Eclipse - Part 3

1. Introduction
For several reasons, this will probably be the last post on the theme "ReSharper VS Eclipse". First of all: This was never intended as a blog series, but the content was too much to fit in one post. Secondly: I have a lot of other stuff that I would love to write about. It would however be fun to make more of a ReSharper-focused blog series. This is something that I'll hopefully be able to do at my new Employment at Edument.

For now, however, I'll try to wrap this up. In this post I'll cover a little about unit test integration as well as a few handy shortcuts which I use more or less everyday now. Again. Keep in mind that I'm using the IntelliJ IDEA keyboard mapping since it felt more intuitive for me. In Eclipse, I'm using the default keymap settings (Except that I've changed the Alt+F6 mapping to Alt+Tab).

In order to have something to test, I wrote a small application using test driven development (TDD) for this article. It's a small, very simple, string parser. It takes input on the form of "2+3-1" and calculates the result. A parser such as this is quite gratifying to develop using TDD principles. Unit tests is a very handy way of checking different input combinations. This kind of testing also helps you catch errors such as broken existing functionality (which would cause your older tests to fail).

I'm not going to delve to deep into TDD in this article. Nor am I going to explain how unit testing works. These are interesting areas, but I don't want to lose focus.

... I might have to do an article about TDD in the future ;)


2. Testing out of the box
You usually have some choice in selecting your unit testing framework. There's all kinds of xUnit-testers for different languages. For instance, JUnit for Java, NUnit for .NET, CppUnit for C++ and SUnit for Smalltalk, which seem to have started the chain of unit testers to begin with. There's a lot more than the ones I mentioned here, but you get the idea.

For Java, I usually end up with JUnit. There's another variant called 
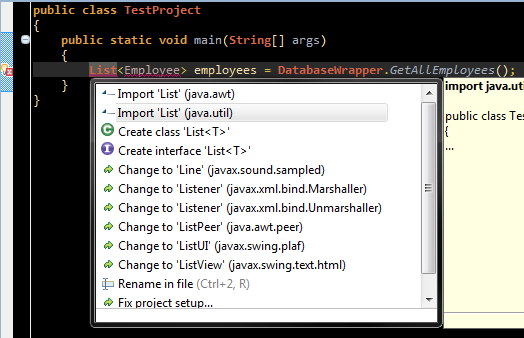
TestNG which looks good too (and comes with an Eclipse plugin). Since testing with JUnit is supported directly through the Eclipse IDE without having to install any extra plugins (See figure 1), this is the one I prefer (even when doing Android testing).


Figure 1: The Eclipse JUnit Test Runner


For .NET, I exclusively use NUnit. Microsoft have their own test framework, containing the MSTest unit tester, but I have to admit: I haven't really looked that hard at it since NUnit works well (for a comparison between the two, read The Bare Bones Coder's blog). By default, Visual Studio does not contain an environment to support NUnit test execution. You usually run a separate NUnit application where you see your test results after execution. Even though the NUnit test runner is a very good application, I prefer to be able to contain as much of my tools as possible inside the IDE (Which is why I use Eclipse when doing Java - There's a plugin for everything). Even though Visual Studio does not support NUnit to start with, ReSharper solves this problem for us: We get the Unit Test Explorer as well as a Unit Test Sessions window (see figure 2 and 3)

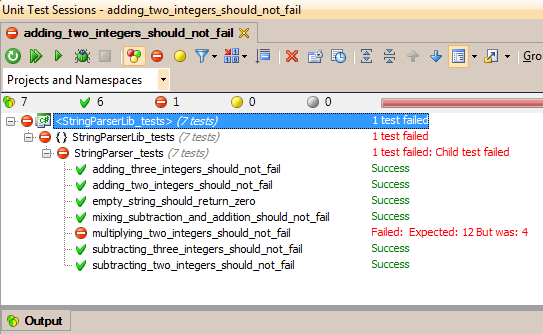
Figure 2: The Unit Test Sessions Window in VS via ReSharper 6

The Unit Test Explorer (Figure 3) is a list containing all of your tests, while the Sessions window (figure 2) is where you actually run all tests in a session. Sessions can be configured to contain different combinations of unit tests, which gives you a great deal of control when different tests are run.


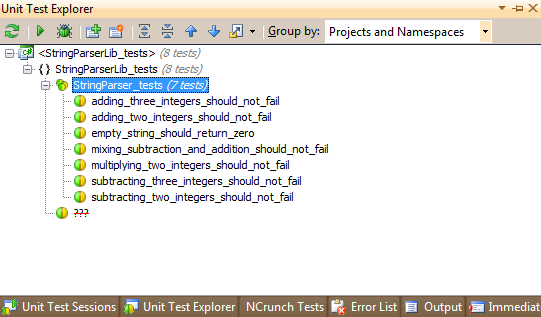
Figure 3: The Unit Test Explorer in VS via ReSharper 6

The of the test names gives you an idea of what the parser can do and what it can't. I implemented it up to the point where integer addition and subtraction works. The parser takes strings on the form "2+3-1+2" and returns the correct result. As you can see in both JUnit and the ReSharper unit test session, multiplication is not implemented, causing the test to fail.


3. Shortcuts when testing


3.1 - Eclipse
The first thing that I want to be able to do is to run my unit tests in an easy manner. In Eclipse, you could select your Project Explorer, right click on the project containing your tests, and select Run As and then JUnit Test. Or, as you can see in figure 4, you could use the keyboard chord Alt+Shift+X, T to run the tests. This is of course the preferred method compared to clicking through menus.

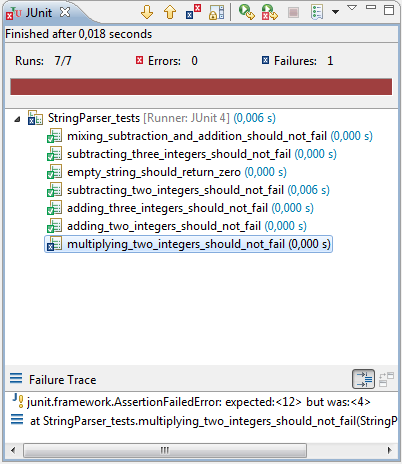
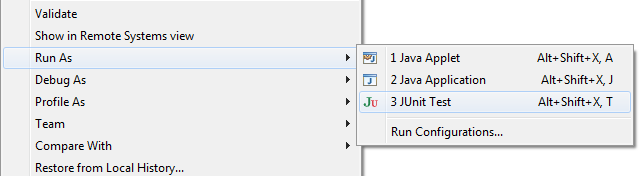
Figure 4: Running the JUnit test project inside Eclipse

If not already opened, this causes the JUnit test runner tab to open in Eclipse. You get a failure trace containing the JUnit output and some basic navigation functionality such as navigate to the next/previous test which failed. You can also select to show failing tests only and to rerun tests. Reruns can be set to either run everything again (same order as before) or by prioritizing failed tests higher (run all failed tests first, then everything else).

Now, the Alt+Shift+X, T command seems to be running the unit tests in the current file. You CAN run all unit tests in a specific project, or only one certain unit test. The problem is, that this is done by right clicking the folder or project or method etc. where the test or tests reside. It's the same commando everywhere (Alt+Shift+X, T), but when you use the keyboard shortcut, it's typically from inside the editor, which will only run the tests in the current file. So, if I want to run a specific test only, I have to find the method, right click it and select "Run as JUnit Test". If I want to run all tests in a specific test fixture, I have to either navigate to the class and press Alt+Shift+X, T or Select "Run As -> JUnit Test" on the class. If I have several test fixtures and want to run all tests in a project, I have to select "Run As -> JUnit Test".

If there's another shortcut for these things in Eclipse, I have completely missed them. If so: please enlighten me, since I consider this to be a major drawback. I might be wrong here, and if so, I'm more than happy to correct the article.


3.2 - ReSharper/VS
In ReSharper, you have a couple of different options. First of all, you have the equivalence of the Eclipse command by pressing the keyboard chord Ctrl+T, R which runs all unit tests in the current file. The rest of the commands can be seen in figure 5.

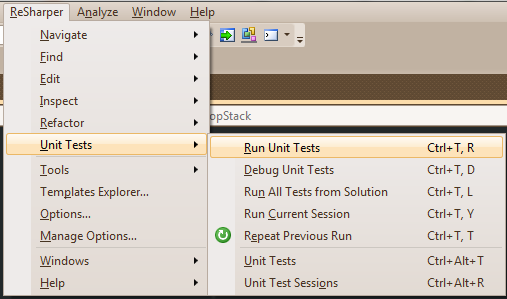
Figure 5: ReSharper Unit Test Commands

As in Eclipse, you have the ability to rerun tests as well as some session based shortcuts. You also have the ability to bring up the unit test explorer (Ctrl+Alt+T) and the unit test sessions window (Ctrl+Alt+R).

One that's widely used by me is the Run All Tests from Solution. You could press Ctrl+T, L to accomplish this. But I actually use the actual menu item (through shortcuts though). Look at the sequence you have to press in order to reach this command. First of all, Alt to focus on the menu bar. Then R to navigate to the ReSharper menu, U to select the Unit Tests sub menu and lastly N to select Run All Tests from Solution. So. You simply press Alt and type RUN. It's subtle, but it's there. This is the kind of things that I really like.


5. More refactoring and navigation options
Since this is the last post on the theme, I'm going to try and wrap this up by naming a few of my favorite shortcuts.


5.1 - Go to Type / Open Type
Opens the specified type. Both ReSharper and Eclipse gives you a menu where you simply start writing the type name and presses enter. In ReSharper, it's called Go to Type and has the shortcut Ctrl+N while it's called Open Type in Eclipse and has the shortcut Ctrl+Shift+B.

Commands closely related to this one which I use often includes ReSharper's Go to File (Ctrl+Shift+N) and Eclipse's Open Resource (Ctrl+Shift+R). A nice feature in both systems is that you can enter the capital letters of a type name when searching. For instance, to find the class StringParser, it's sufficient to write "SP" as the search term.


5.2 - Introduce variable / Extract local variable
Comes in handy quite often for me. It's called Introduce variable in ReSharper (Shortcut: Ctrl+Alt+V) and Extract local variable in Eclipse (Shortcut: Alt+Shift+L). It assigns the return value from a method (or similar) to a new variable (for instance, when calling a method and never assigning the return value, this is an option).


5.3 - Recent files
This is one of the navigation options that doesn't really have a equivalence in both systems. In ReSharper, you have the "Recent Files" list which you bring up by pressing Ctrl+E. You can write search terms here too, just as in the "Go to Type" feature.

Except the "Recent Files" area on the file menu, Eclipse doesn't really have a counterpart to this. It does however have a couple of related commands: You have the ability to switch between recently edited files by pressing Alt+Left and Alt+Right (ReSharper has a similar to this one: Go to last edit location, Ctrl+Shift+Backspace). Furthermore, by pressing Ctrl+F6 (Which I have changed to Ctrl+Tab in my setup) you can switch between currently open editors, and by pressing Ctrl+E you can even add a search term when switching between open editors.


5.4 - Refactoring
ReSharper has a Refactor this menu which you can bring up by pressing Ctrl+Shift+R. Most of the items on this menu has shortcuts of its own too. In Eclipse, you get the Refactor quick menu by pressing Alt+Shift+T. Both systems have a lot of operations in common here. This includes the ability to extract superclasses, interfaces and methods, introduce local or field variables as well as changing declarations to use supertypes where possible.


5.5 - Miscellaneous
I can think of one shortcut in Eclipse which is quite useful (and, as far as I know, doesn't exist in ReSharper). By pressing Ctrl+Shift+L, you can bring up an entire reference for all keyboard shortcuts. It's not a necessity, but it IS without a doubt useful. Pressing Ctrl+Shift+L again brings up the settings page where you can change the default shortcuts.

Other than this, both ReSharper and Eclipse has a lot of functionality for navigating which I haven't covered yet, such as navigating to base symbols (where the symbol is either a method or a class etc.) which is done through Ctrl+U in ReSharper (can't find it in Eclipse. I usually end up pressing F3 for Go to declaration). You can navigate in the opposite direction too (from base to implementation) by using Go to derived symbols in ReSharper (Shortcut: Ctrl+Alt+B). In Eclipse, I usually use the Quick Type Hiearchy for this by pressing Ctrl+T, which shows the inheritance tree for a particular class.


5. Some reflections on the learning aspect
I have just scraped the surface of both ReSharper and Eclipse. Personally, I use a lot more shortcuts than I've been able to cover in three posts. There's shortcuts for code generation such as creating constructors, wrapping code in try/catch and much, much more. But it takes time to learn everything.

One of the tips I got (can't really remember from where) when I started using ReSharper was to print a copy of the keymapping and keep near my computer at all times (And, in Eclipse: Press Ctrl+Shift+L). While I think that this has helped me a lot so far, It's also important not to get ahead of yourself. It's both fun and good to try different shortcuts out just to see what happens. This gives you an idea of what the environment CAN do (which is an important grasp to have), but trying 15-20 commands in as many minutes will not make them stick. Instead, let it come naturally by using shortcuts when applicable. Learning is always easier when you have a reason to learn.

Furthermore, when a command that you're just learning IS applicable, try to force yourself to actually use it (preferably through keyboard shortcuts without touching the mouse at all). Piece by piece, you'll construct your own "library" of useful shortcuts which you'll be dependent upon in order to be quick and precise. As John Dewey said: "Learning by Doing" ;)


6. And, finally...
The only thing I can really say is that I'm going to continue use Eclipse whenever I'm creating something in Java. It's a great environment with lots of functionality. Depending on mood and which OS I'm sitting in I sometimes use Eclipse for C++ development too. Eclipse is big on refactoring and best practices (Who knows: It might have helped that Erich Gamma has been involved in Eclipse - Design Patterns anyone?)

Whenever I'm creating something in C# however, I'm going to use ReSharper in Visual Studio. I had a small period of time (couple of days) between where my ReSharper trial ended and I obtained my actual license. During these days, Visual Studio felt much harder to use. It might (perhaps) have helped if I had used the VS keymap instead of the IntelliJ one since I've had at least some of the same shortcuts. But all in all: Visual Studio without ReSharper felt a little like bread without butter (Or some other more meaningful analogy, but I'm hungry right now).


Functionality Eclipse ReSharper
Go to declaration F3 Ctrl+B
Rename in file Ctrl+2, R F2
Rename everywhere Alt+Shift+R F2
Run unit tests in file Alt+Shift+X, T Ctrl+T, R
Run ALL unit tests - Ctrl+T, L or Alt+RUN
Go to type / Open type Ctrl+Shift+B Ctrl+N
Introduce/Extract variable Alt+Shift+L Ctrl+Alt+V
Refactor menu Alt+Shift+T Ctrl+Shift+R
Shortcuts menu Ctrl+Shift+L -


6. Some useful links

1. ReSharper documentation, including keymappings for both the IntelliJ and the Visual Studio mapping. Print a copy of the PDF version. http://www.jetbrains.com/resharper/documentation/index.jsp

2. Dave Ford's Programming Blog: 10 IDE Shortcuts Everyone Should Know. Shows a couple of common operations in Eclipse and IntelliJ IDEA. http://dave-ford.blogspot.com/2006/11/10-ide-shortcuts-everyone-should-know.html

3. For those of you wanting to read more about TDD: http://www.agiledata.org/essays/tdd.html

4. Lars Vogel's JUnit Tutorial - For those of you that want to know more about how unit testing works. In this case, through JUnit and Java. http://www.vogella.de/articles/JUnit/article.html

5. NUnit Quickstart - For those of you that want to know more about how unit testing works. In this case, through NUnit and .NET (C# to be specific). Not the best tutorial out there, but it's a quick way to discover the basics. http://www.nunit.org/index.php?p=quickStart&r=2.4


... Long post. Congratulations if you made it all the way here!

Thursday, January 19, 2012

ReSharper versus Eclipse - Part 2

1. Introduction
One of the (by me) most used and least hidden feature of both ReSharper and Eclipse is the Quick Fix, which I covered in the last post.

There's also a couple of handy keyboard shortcuts when it comes to navigating code, auto-generating code and renaming classes, files, variables etc.

But let's talk about keyboard mappings in ReSharper. You have two options: Either you use the Visual Studio  scheme, or you use the IntelliJ IDEA scheme. The Visual Studio scheme lets you use a lot of the default settings from Visual Studio (but mapped to ReSharper commands, if available) while the IntelliJ IDEA scheme maps keyboard shortcuts to fit a lot of the features found in Jetbrain's Java IDE (IntelliJ IDEA).

Until today, I had never even tried the IntelliJ IDE (I actually downloaded it today just to see how efficiently I could use it after being accustomed to the ReSharper keymapping). With ReSharper, I played around a bit with both the VS-scheme and the IDEA-scheme and found the IDEA-scheme a lot simpler to use.

However, when doing a clean install av VS 2010 and ReSharper 6.1, I found a small bug. At least one Visual Studio shortcut doesn't get overridden the way it should. Annoyingly enough, this is the shortcut called "Go to declaration", which I use all the time. In IntelliJ, this is bound to CTRL+B, but Visual Studio waits for a keyboard chord instead. Since the default Visual Studio shortcut for this (F12) gets overridden by another ReSharper feature all together, you more or less lose the feature entirely.

Apparently, I'm not the only one who encountered this, and a bug ticket was already filed (and now, assigned too):

Luckily, it's a simple fix. I discovered this by a fluke when importing a new color theme for Visual Studio. Simply do the following:

  1. Select Tools -> Import/Export -> Export selected environments settings and save the settings file.
  2. Select Tools -> Import/Export -> Import selected environments settings
  3. Select the option to just import and overwrite your current settings.
  4. Select the file you just exported.

This seems to do the trick, and CTRL+B works again. This bug doesn't seem to happen when updating from an older version (according to some of the comments on YouTrack).


2. Some useful keyboard shortcuts
So, using the IntelliJ scheme in ReSharper, and the default settings in Eclipse, here are some really useful features:

Navigation: Go to declaration (ReSharper) / Open declaration (Eclipse)
Does exactly what it sounds like - Opens the declaration. For instance, selecting this with the cursor over a class name opens the file containing the class and puts your cursor at the class declaration. With the IntelliJ shortcut, this is bound to CTRL+B while Eclipse uses the F3 key.

Renaming options: Variables and class names
Quite useful in order to rename your variables, class names and file names throughout your project. Eclipse has a somewhat clumsy way of doing this since it basically separates this into two features. The first one is called Rename in file an renames instance names, class names etc. in the current file only. The shortcut is a keyboard chord: CTRL+2, R. The other feature is Rename in workspace, which replaces all instances of the name in the entire workspace. The shortcut for this one is ALT+SHIFT+R. Both of them are also available through the quick fix (which I tend to use here instead)

In ReSharper, this is more or less baked together into one command: F2
For me, using F2 makes a lot of sense, since this is the usual "renaming" shortcut. It's used in a lot of file explorers such as MS Explorer in Windows, but also Dolphin and Nautilus (for the KDE and Gnome desktop environments, respectively). However, since Eclipse supports the option to change individual bindings, you could basically just do this. You could also change your layout completely. As in ReSharper, Eclipse supports multiple schemes. For instance, you could use schemes similar to the EMacs Text Editor.

Renaming options: Files
Eclipse and Resharper both have some really good renaming features when it comes to renaming files. For instance, a lot of times you'll want to rename a file after renaming a class. This is especially true when doing Java, since Java demands that a .java file contains one and only one class/interface (inner classes excepted). But more often than not, you'll want to at least follow this convention in .NET too (Yes, I know that there are cases where it's logical to group several classes into one file).

In ReSharper, you can of course use the F2 key, and in Eclipse, the ALT+SHIFT+R key, both described above. But you have options. In both environments, you could just simply change the class name directly in the source and use the quick fix to apply the refactoring. For instance, suppose I want to rename a class in Eclipse from TestProject to MyTestProject. This will immediately cause a compile error, but also trigger a quick fix renaming option, as seen in figure 1:

Figure 1: Renaming via the Eclipse quick fix

The same holds in VS+ReSharper, sans the compile error. If I try to rename a class from StrCalcTest to StrCalcTester, I get the following quick fix:

Figure 2: Renaming via the ReSharper quick fix - And yes: I finally have a dark theme for VS!


3. Final thoughts
So, I'm not going to try and answer the question of "which one is better" here, since both environments pretty much do what they are supposed to do. However, I thought that a small map of how the shortcuts in Eclipse and ReSharper relate could be of use. I'll try to include an updated version of this list in the end of every post from now on.


Functionality Eclipse ReSharper
Go to declaration F3 Ctrl+B
Rename in file Ctrl+2, R F2
Rename everywhere Alt+Shift+R F2


Hopefully, I'll be able to build a large comprehensive list of commands over time.


4. What's next?
I'm thinking TDD: How well does ReSharper VS Eclipse integrate with test tools such as NUnit and JUnit, respectively? Do we have any useful shortcuts or other information that could simplify things for us?

... I'm aware of a few, but I'm definitely going to find out more about it until I post again.

Tuesday, January 17, 2012

ReSharper versus Eclipse

A small note: This article is about different refactoring and productivity options in Eclipse and VS+ReSharper. I could write tons of pages between these differences. After writing about ONE feature, I realized that this would be one really huge blog post if I didn't break it down into smaller posts. So: I'll try to describe one feature per blog post.


1. Introduction
For those of you who don't know, ReSharper is a refactoring/productivity-tool for the Visual Studio IDE, written by JetBrains. Refactoring is basically the process of changing the internal structure of code, without modifying it's external behaviour. Eclipse has had built-in refactoring support for as long as I have used it (couple of years), whereas Visual studio has had some simpler refactoring tools. However, with the ReSharper-extension, you get a lot of new refactoring options. And, bottom line: It's awesome and I'm starting to become slightly addicted to it.

I usually write a lot of Java. I have done some Java EE using the RestLet framework and a lot of Android programming the latest months or so. The Eclipse IDE is usually a good fit for these activities. Being used to Eclipse, I'm also used to some nifty features which are not found in Visual Studio. Sure, VS has some refactoring capabilites, but it's quite limited. For instance, I'm used to hitting CTRL+1 in Eclipse in order to bring up the Quick Fix-menu. This is the one I use most frequently in both Eclipse and with ReSharper, so I'll start with this feature.


2. A glance at the quick fix feature
Suppose you want to use the generic List interface in Java. Since it's a generic interface, it takes a generic type argument too. For the sake of argument (no pun intended), let's say that you're accessing a database containing employee-data and you're feeding the data for a specific employee into an Employee-object. That would cause you to create a list of the type List<Employee>. In Eclipse, creating and populating such a list could look something like the following:

List<Employee> employees = DatabaseWrapper.GetAllEmployees();

Simple enough. However, the above code wouldn't compile since the compiler has to be able to actually find the List-interface, which is part of the java.util package. So, you would add one more line to make it compile:

import java.util.List;
List<Employee> employees = DatabaseWrapper.GetAllEmployees();

Then again, perhaps your Employee class resides in another package called myapp.data where you store all your DTO:s (data transfer objects). It's not uncommon to modularize your application this way. This would cause us to add another import statement:

import java.util.List;
import myapp.data.Employee;
List<Employee> employees = DatabaseWrapper.GetAllEmployees();


Still not that many extra words to add to your source. BUT: As projects and source files grow, these import statements are actually quite tedious to maintain. Not only to add, but to remove as well when you suddenly realize that you don't need that list anymore. Some class files can have A LOT of import statements, which makes auto insertion quite useful.

The solution is the "Quick Fix" feature. Press CTRL+1 in Eclipse to bring this one up. You'll get something like figure 1:

Figure 1: Quick Fix in Eclipse

You'll select your import, and Eclipse will add your import to the top of the file. Note the small lightbulb to the far left, which indicates that a quick fix is available.


Now, using Visual Studio 2010 and ReSharper 6.1 instead, you can basically do the very same thing. The Quick Fix in ReSharper is (by default) available through ALT+ENTER instead. For a project similar to the Java program above, this would give us the situation in figure 2:

Figure 2: Quick Fix in Visual Studio 2010 with ReSharper 6.1
As in Eclipse, we get a small lightbulb, indicating a quick fix. C# / .NET doesn't have "package" names, but namespaces instead. The idea, however, is similar. We need to add import statements, and the quick fix allows us to automate this. Usually, this should rather be written as:

var employees = DatabaseWrapper.GetAllEmployees();

But in order to illustrate the functionality, I'm not using the "var" keyword.


3. Is this all the quick fix does?
The answer here is simple: No. The quick fix can do a lot more, both the Eclipse version and the ReSharper version has a lot more capability than adding and removing imports. One of the more important aspects for me is the ability to generate code. This comes in handy when writing unit tests and doing test driven development in general where you'll usually want to write how you interact with your code before the actual implementation.

For instance, using the Employee-example above, we might know that we want to obtain a list of employees from a DatabaseWrapper object. We might not have written the DatabaseWrapper class or decided how the GetAllEmployees() method in it should be implemented, but we know it should be there. Trying to use a non-existent class will obviously give us a compilation error, but it will also trigger the Quick Fix:

In Eclipse, the quick fix would give us the alternative as seen in figure 3:

Figure 3: Generating a new class with the Eclipse Quick Fix

In Visual Studio + ReSharper, we would get figure 4, instead:


Figure 4: Generating a new class with the ReSharper Quick Fix


In Eclipse, this creates a new file with the same name as the class. The generated source code is placed within this file. Anything else would have been odd, since Java demands that a class is placed in a compilation unit with the same name. In C#, classes don't have to be placed in a source file with identical name, and ReSharper places the newly generated class in the same file where you used the quick fix.

Usually, but not always, in C# I would want to place my classes in files with matching names. This is no problem. Just place the marker over the class name, hit ALT+ENTER again and select "Move to another file to match type name", as seen in figure 5:


Figure 5: Move class to file with matching name

Note: If ReSharper creates an internal class instead of a public one: Use the quick fix over the "internal" keyword and select "To public".

Now, the next step in both Eclipse and Visual Studio would be to use the quick fix again and repeat this step with the GetAllEmployees() method, which will create a static method in the class, where you initialize your list. The idea is the same as before: CTRL+1 or ALT+ENTER and select the fix.


4. So, which one is better? (Conclusion)
First of all, one should be aware of the fact that while Eclipse is free, ReSharper costs money. However, this might be money well spent in order to increase productivity. ReSharper is available as a fully functional 30-day demo, so it can easily be tried out anyway.

Second of all: This blog post is in no way a complete, comprehensive review of either Eclipse or ReSharper. There is a lot of "little things" that I did when doing this demo that I simply didn't explain and took screens of. It would result in a too large blog post with too much sidetracking.

Both the ReSharper and the Eclipse quick fixes has its pros and cons, but my initial feeling is that the ReSharper-version tends to be less cluttered with irrelevant choices. Writing this, I did find one nice feature with the ReSharper quick fix, though. I wrote a small mock implementation of the GetAllEmployees() to get the code to compile. The implementation looked like this:

public static List<employee> GetAllEmployees()
{
   var employees = new List<employee>();
  
   employees.Add(new Employee("Eric", "Lavesson", "Software developer"));
   employees.Add(new Employee("John", "Doe", "Guy who fetches coffee"));
  
   return employees;
}


I saw that ReSharper offered a quick fix to use the collection initializer instead (that is, initializing the list at creation instead of calling the .Add everytime). I used the quick fix and ended up with:

public static List<Employee> GetAllEmployees()
{
   var employees = new List<Employee>
         {
            new Employee("Eric", "Lavesson", "Software developer"),
            new Employee("John", "Doe", "Guy who fetches coffee")
         };

   return employees;
}


... Which, for me, is a really nice refactoring feature to have. Now, the Java language and the C# language has some differenses, which the available quick fixes of course is dependent on. For instance, ReSharper also has the really nice option of converting some code (such as for loops et cetera) into Linq-code. For obvious reasons, this doesn't work in Eclipse as this is a language restriction (Linq is .NET-specific), not a refactoring question.

All in all, the two features are very much alike. And, at the end of the day, this is the command I use most of the time in both environments.


5. What's next?
I'm going to write at least one more blog post about refactoring options in Eclipse and VS+ReSharper. Next time, I'll probably look at a couple of renaming and code navigation options instead.

... And perhaps a keyboard shortcut reference to show how commands are mapped in Eclipse VS VS+ReSharper..?

Monday, January 16, 2012

First post. Ever.

So...

I never though I would ever join the blogging force - Especially since I've never felt that I could contribute with that much. Seems like this might change though. 

A little background:
I'm currently making the transition from teacher to software developer.

First of all: I'm one of those people who thinks both computer science, math and physics are fun and interesting subjects. Actually, I'm kind of a sucker for technology, scientific methods and objectivity in general. Due to this, I started reading math and physics (without any concise goal) at a swedish university college. After some year, I realized I actually had to work with something too. Seeing how I liked talking about my areas of expertise until people were sick of me, I enrolled at a Master of Educations programme (teacher education), with math and physics as my areas.

Somewhere along the way, I picked up an old interest (software development), which used to take up a lot of my spare time. I started taking some evening classes at college in different programming languages, such as C++ and VB.NET, continuing with some summer classes every year. At the time where I got my education master, I was well on my way to another degree, but this time a bachelor in computer engineering.

Long story short: I've worked in the swedish school system (gymnasium, or "pre"-college, roughly ages 16-19) for the last three years and has worked towards my bachelor the entire time. Today I'm doing my thesis work and I'm about to start a new job as a .NET consultant in a couple of months at Edument AB, something that I'm really looking forward too.

This blog is my outlet, I guess. I'll try to document and share some of my experience as developer. I'll try to share some insight into starting a new career and, hopefully, I'll be able to share some tips and tricks for other developers out there.

Perhaps no one will read this post - I don't mind right now. It might be fun to look back at in a year.
Who knows.

... My first post after this one will most definitely be about my first experience with ReSharper 6.1 ;)